2018年2月2日 星期五

Visual Studio Code更改UI語言-繁體中文轉英文 & 英文轉繁體中文

版本相關資訊:

System version : Windows 10  64-bit
Visual Studio Code version : 版本 1.19.3

繁體中文轉英文

鍵盤輸入 Ctrl + Shift + P 跳出指令輸入框
輸入框 => 設定語言 => Enter
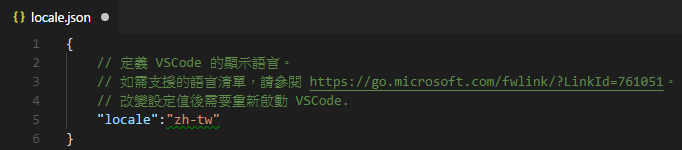
把"locale":"zh-tw"改為"locale":"en" 
vs_code1.png
vs_code2.png
儲存後重開 Visual Studio Code 即可

英文轉繁體中文

鍵盤輸入 Ctrl + Shift + P 跳出指令輸入框
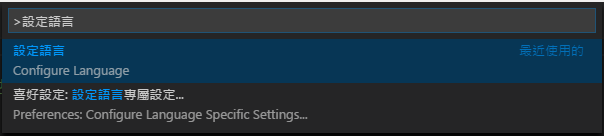
輸入框 => configure Language => Enter
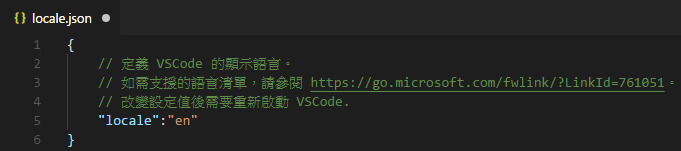
把"locale":"en"改為"locale":"zh-tw"  
vs_code3.png
vs_code4.png
儲存後重開 Visual Studio Code 即可

2018年2月1日 星期四

Python - Information Retrieval Evaluation-排序效果評估 (NDCG)

Information Retrieval Evaluation-排序效果評估 (NDCG)

版本相關資訊:

System version : Windows 10  64-bit
Python version : Python 3.6.0 :: Anaconda 4.3.1 (64-bit)

內文:

NDCG (Normalized Discount Cumulative Gain)
當資料有標記多等級時,可以使用NDCG來評估
算出的NDCG值愈接近1,代表效果越佳
以下為NDCG的計算公式與簡單範例:
i為新排序結果
reli為真實的排序等級


python codes:

"""
程式參考自:
https://gist.github.com/bwhite/3726239
https://gist.github.com/gumption/b54278ec9bab2c0e0472816d1d7663be
差異:新增「 sum (2^rel_i - 1) / log2(i + 1) 」的版本
作者:Jie Dondon
版本:ndcg_dondon_20180201_v2
"""

import numpy as np

def dcg_at_k(r, k, method=0):
    """Score is discounted cumulative gain (dcg)
    Relevance is positive real values.  Can use binary as the previous methods.

    There is a typographical error on the formula referenced in the original definition of this function:
    http://www.stanford.edu/class/cs276/handouts/EvaluationNew-handout-6-per.pdf
    log2(i) should be log2(i+1)

    The formulas here are derived from
    https://en.wikipedia.org/wiki/Discounted_cumulative_gain#Discounted_Cumulative_Gain

    The formulas return the same results when r contains only binary values
    >>> r = [2,3,2,3,1,1]
    >>> dcg_at_k(r,6,1)
    12.674304175856518
    >>> r = [3,3,2,2,1,1]
    >>> dcg_at_k(r,6,1)
    14.951597943562946


    Args:
        r: Relevance scores (list or numpy array) in rank order
            (first element is the most relevant item)
        k: Number of results to consider
        method: If 0 then sum rel_i / log2(i + 1) [not log2(i)]
                If 1 then sum (2^rel_i - 1) / log2(i + 1)
    Returns:
        Discounted cumulative gain
    """
    r = np.asfarray(r)[:k]
    if r.size:
        if method == 0:
            return np.sum(r / np.log2(np.arange(2, r.size + 2)))
        elif method == 1 :
            return np.sum(np.subtract(np.power(2, r), 1) / np.log2(np.arange(2, r.size + 2)))
        else:
            raise ValueError('method must in [0,1]')
    return 0.

def ndcg_at_k(r, k, method=0):
    """Score is normalized discounted cumulative gain (ndcg)
    Relevance is positive real values.  Can use binary
    as the previous methods.
    Example from

    2013-Introduction to Information Retrieval Evaluation p.3
    (http://www.stanford.edu/class/cs276/handouts/EvaluationNew-handout-6-per.pdf)
    ↑ 此份文件的公式有誤,導致提供的結果也是錯誤的
    2012-微軟亞洲研究院-武威-機器學習及排序學習基礎 p.36

    >>> r = [2, 1, 2, 0]
    >>> ndcg_at_k(r,4,0)
    0.96519546960144276
    >>> r = [2,3,2,3,1,1]
    0.84768893757694552

    Args:
        r: Relevance scores (list or numpy array) in rank order
            (first element is the most relevant item)
        k: Number of results to consider
        method: If 0 then sum rel_i / log2(i + 1) [not log2(i)]
                If 1 then sum (2^rel_i - 1) / log2(i + 1)
    Returns:
        Normalized discounted cumulative gain
    """
    dcg_max = dcg_at_k(sorted(r, reverse=True), k, method)
    if not dcg_max:
        return 0.
    return dcg_at_k(r, k, method) / dcg_max

使用方式:

r是一個list,list的順序為透過新方法排序的新排序結果,裡面的數字代表真實的等級,分數越高代表等級愈高。
k是要考慮的結果數量。
method為使用不同的公式:NDCG有不同的計算公式,原始作者僅提供兩種,此次修改的程式多提供一種方法,方法編號為1,公式如本文開頭所放的範例圖片。
r = [2, 1, 2, 0]
ndcg_at_k(r,4,0)
0.96519546960144276
r = [2,3,2,3,1,1]
ndcg_at_k(r,6,1)
0.84768893757694552
2017年12月29日 星期五

Python - 清單刪除重複元素,保留原清單排序的作法 - How to remove all duplicate items from a list

版本:

System version : Windows 10  64-bit
Python version : Python 3.6.0 :: Anaconda 4.3.1 (64-bit)
list1=[1,2,4,3,1,2]
list1_remove_duplicate = sorted(set(list1),key=list1.index)
print(list1_remove_duplicate)

執行結果

[1, 2, 4, 3]

2017年12月27日 星期三

Python - Python 3.6.0 Anaconda 4.3.1安裝statsmodels 8.0.0失敗

版本:

System version : Windows 10 64-bit
Python version : Python 3.6.0 :: Anaconda 4.3.1 (64-bit)
使用pip 安裝會出現以下錯誤訊息
    Exception: Cython-generated file 'statsmodels/tsa/kalmanf/kalman_loglike.c' not found.
            Cython is required to compile statsmodels from a development branch.
            Please install Cython or download a source release of statsmodels.
使用conda安裝,可以成功,但import statsmodels後無法正常使用。
到第三方網站下載合適版本的wheel
第三方網站連結:
Python36 windows64 64-bit statsmodels-0.8.0的下載連結:
wheel依個人環境與版本不同,請自行更改
開啟cmd將目錄換到wheel存放的目錄,安裝
pip install  statsmodels-0.8.0-cp36-cp36m-win_amd64.whl

2017年11月22日 星期三

Django - 當Django的DEBUG設為False,無法讀取staticfiles的問題

當Django的settings.py中DEBUG由True改為False,為開發環境轉換為生產環境必改的設定。
DEBUG改為False後,讀取靜態檔案發生錯誤,原來DEBUG設置DEBUG為False時,’django.contrib.staticfiles’會關閉,即Django不會自動搜尋靜態檔案。
靜態文件不能讀取導致2個問題:
  1. CSS、JS檔案無法讀取
  2. 通過url不能訪問靜態文件,如圖片、檔案
網路搜尋的處理方式眾多,但隨著Django版本不同,過去的紀錄已不適用。
以下為Django1.11版本參考網路上的紀錄修改後的版本

版本:

System version : Windows 10,Ubuntu16.04   
Python version : Python 3.6.0 :: Anaconda 4.3.1 (64-bit)  
Django version : 1.11.2

檔案結構:

◢ project_name
    ◢ app_name
        ◢ templates
            ◢ app_name
                page1.html
                404.html
        urls.py
        views.py
    ◢ project_name
        settings.py
        urls.py
        views.py
    ◢ static
        ◢ css 
        ◢ js 
        ◢ image 
            favicon.png
    manage.py
project_name/project_name/settings.py
# DEBUG = True
DEBUG = False
STATIC_URL = '/static/'

if DEBUG is False: 
    STATIC_ROOT = (
        os.path.join(BASE_DIR, 'static')
    )

STATICFILES_DIRS = (
    os.path.join(BASE_DIR, "static"),
)
project_name/project_name/urls.py
加入以下程式碼
from django.views.static import serve
from . import settings
if settings.DEBUG is False:
    urlpatterns.append(url(r'^static/(?P<path>.*)$', serve, {'document_root': settings.STATIC_ROOT}))

Django - 自定義404或500的網頁 - custom 404/500 error page setting

版本:

System version : Windows 10,Ubuntu16.04   
Python version : Python 3.6.0 :: Anaconda 4.3.1 (64-bit)  
Django version : 1.11.2

檔案結構:

◢ project_name
    ◢ app_name
        ◢ templates
            ◢ app_name
                page1.html
                404.html
        urls.py
        views.py
    ◢ project_name
        settings.py
        urls.py
        views.py
    ◢ static
        ◢ css 
        ◢ js 
        ◢ image 
            favicon.png
    manage.py
project_name/project_name/urls.py
加入以下程式碼
handler404 = views.error_404
handler500 = views.error_404
project_name/project_name/views.py
加入以下程式碼
from django.shortcuts import render
def error_404(request):
    return render(request, 'app_name/404.html')
project_name/project_name/settings.py
將DEBUG的值改為False
# DEBUG = True
DEBUG = False

Django - Django網站圖示的變更(favicon.ico,shortcut icon)

版本:

System version : Windows 10,Ubuntu16.04   
Python version : Python 3.6.0 :: Anaconda 4.3.1 (64-bit)  
Django version : 1.11.2

檔案結構:

◢ project_name
    ◢ app_name
        ◢ templates
            ◢ app_name
                page1.html
                404.html
        urls.py
        views.py
    ◢ project_name
        settings.py
        urls.py
        views.py
    ◢ static
        ◢ css 
        ◢ js 
        ◢ image 
            favicon.png
    manage.py
project_name/app_name/templates/app_name/page1.html
在html檔的第一行加上
{% load staticfiles %}
在head標籤內加入
<head>
    <title>...</title>
    <link href="{% static 'image/favicon.png' %}" rel="shortcut icon"></link>    
</head>
如果有做繼承關係的網頁,建議將以上程式碼放到父頁面

2017年11月20日 星期一

Python - Convert xml data to dict to in python - 將xml格式轉換為字典

版本

Python version :Python 3.6.0 :: Anaconda 4.3.1 (64-bit)
System version :Windows 10

Codes:

import xmltodict, json
xml_str = '<root><rule>a</rule><right>1</right></root>'
order_dict_tmp = xmltodict.parse(xml_str)
dict_temp = json.loads(json.dumps(order_dict_tmp))
print( xml_str )
print('-'*35)
print( order_dict_tmp )
print( type(order_dict_tmp) )
print('-'*35)
print( dict_temp )
print( type(dict_temp) )

執行結果:

2017年11月8日 星期三

Python - Convert a dict to XML in python - 將字典轉換為XML的格式

版本

Python version :Python 3.6.0 :: Anaconda 4.3.1 (64-bit)
System version :Windows 10

Codes:

# dict to xml
from xml.etree.ElementTree import Element
from xml.etree.ElementTree import tostring
def dict_to_xml(tag, d):
    ele = Element(tag)
    for key, val in d.items():
        child = Element('key',{'name':key})
        child.text = str(val)
        ele.append(child)
    return ele

dic1 = {'a':5,'123b':22,'c':'str1'}
print(dic1)
print('-'*85)
xml_str = tostring(dict_to_xml('score', dic1)  )
xml_str2 = xml_str.decode()
print(xml_str2)
print('='*85)
xml_str = tostring(dict_to_xml('score', dic1), encoding='utf8', method='xml')
xml_str2 = xml_str.decode()
print(xml_str2)

執行結果:

2017年9月7日 星期四

Python - Building a list using for loop and other work about list - list用迴圈產生、list串接(相加)、使用迴圈切割list

Python version :Python 3.6.0 :: Anaconda 4.3.1 (64-bit)

System version :Windows 10
list1 = ['a'+str(x) for x in range(7)]
print(list1)
print('='*40)

list2=[]
for a in range(2):
    list2=list2+list1
print(list2)
print('='*40)

num = 3
for a in range(0,len(list2),num):
    print(list2[a:a+num])
執行結果:
['a0', 'a1', 'a2', 'a3', 'a4', 'a5', 'a6']
========================================
['a0', 'a1', 'a2', 'a3', 'a4', 'a5', 'a6', 'a0', 'a1', 'a2', 'a3', 'a4', 'a5', 'a6']
========================================
['a0', 'a1', 'a2']
['a3', 'a4', 'a5']
['a6', 'a0', 'a1']
['a2', 'a3', 'a4']
['a5', 'a6']

2017年9月5日 星期二

Python - Convert String to list and Convert list to dictionary in Python - 字串藉由指定符號轉為list與list轉為字典

Python version :Python 3.6.0 :: Anaconda 4.3.1 (64-bit)
System version :Windows 10
str1 = '背景,0,特性,1,元件,3'
list1 = str1.split(",")
dic1 = {list1[i]: list1[i+1] for i in range(0, len(list1), 2)}
print(list1)
print(dic1)
執行結果:
['背景', '0', '特性', '1', '元件', '3']
{'背景': '0', '特性': '1', '元件': '3'}

2017年8月30日 星期三

Python - Pretty printing nested dictionaries - 印出巢狀結構的字典

Version:

Python version :Python 3.6.0 :: Anaconda 4.3.1 (64-bit)
System version :Windows 10

Code:

from pprint 
import pprint 
dic1 ={'name':'Dondonaaaaaaaaaaaaaaaaaaaaaaaaaaaaaaaaaaaaaaaaaaaaaaaaaaaaaaaaa', 'number':9527,'item':['a','b','a','b','a','b','a','b','a','b','a','b','a','b','a','b']} 
print(dic1) 
print('='*30) 
pprint(dic1)

Result:


2017年8月2日 星期三

Python - how to widen output display to see more columns and rows in pandas dataframe? - 更改pandas dataframe顯示的行數列數

Version

Python Version:Python 3.6.0 :: Anaconda 4.3.1 (64-bit)
System Version:Windows 10

Code:

import pandas as pd
pd.set_option('display.max_columns', None)
pd.set_option('display.max_rows', None)